Autumn is here: pumpkin cupcakes [+RECIPE]

Sharing is caringShare on FacebookTweet about this on TwitterPin on PinterestShare on Google+Share on Tumblr

Jeans, rainy weekends and Halloween planning means Autumn has arrived. As sad as this makes me and as much as I am going to miss my bikini, I am also looking forward to days spent under the duvet, hot chocolate, soups, and of course: pumpkin! Pumpkin soup, roast pumpkin, pumpkin cake – it is all so very exciting 🙂 And since sharing is caring, you can find below a delicious autumn recipe to whip up when the weather is too miserable to be outside!

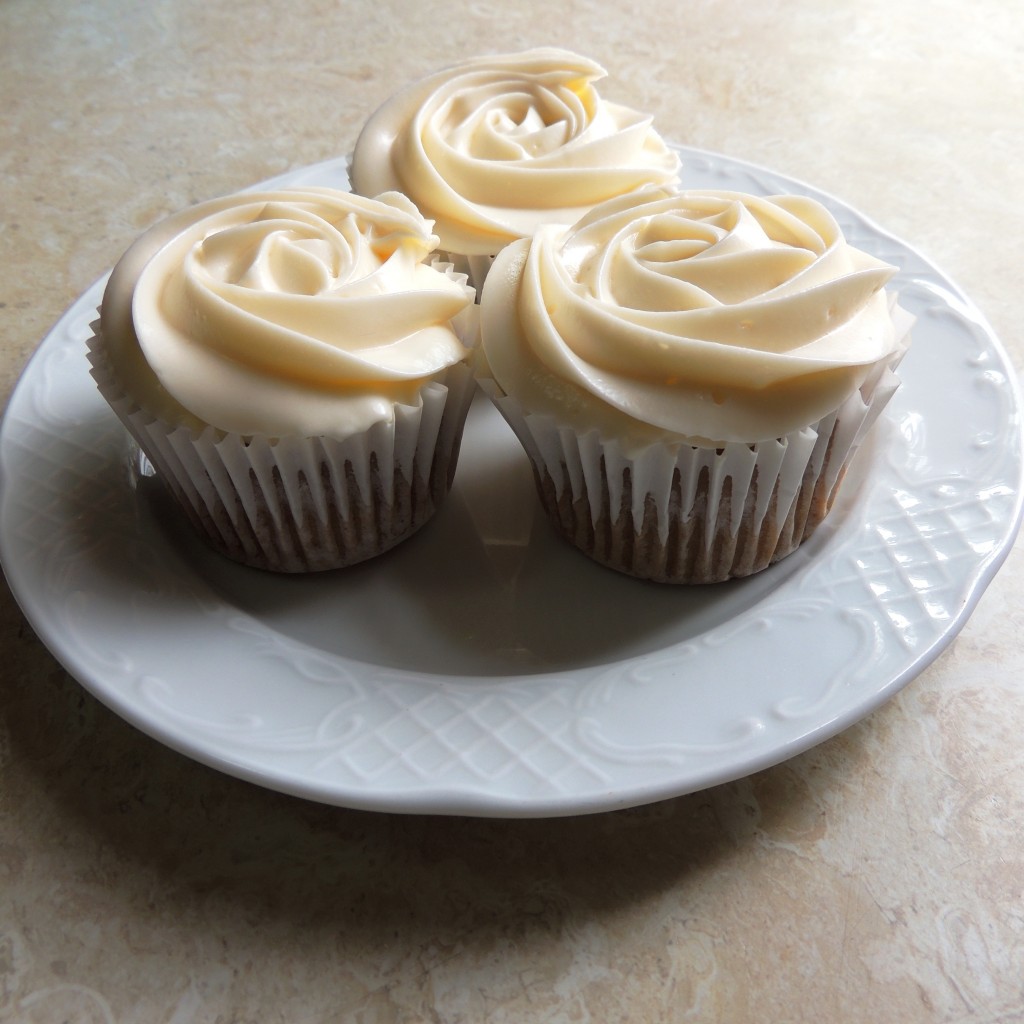
Pumpkin cinnamon cupcakes with cream cheese frosting
(makes 18, includes about 2 hours to prepare pumpkin)

pumpkin cupcakes

Ingredients:
400g pumpkin
2 cups of plain flour
1 cup of light soft brown sugar
1/2 tsp salt
1 tsp baking powder
1/2 tsp baking soda
1tsp allspice
1 1/2 tsp cinnamon
2 eggs
1/2 cup of vegetable oil
1 tsp vanilla extract

75g soft unsalted butter
120g cream cheese
420g icing sugar
2-3 tbsp whole milk (if needed)

Method:
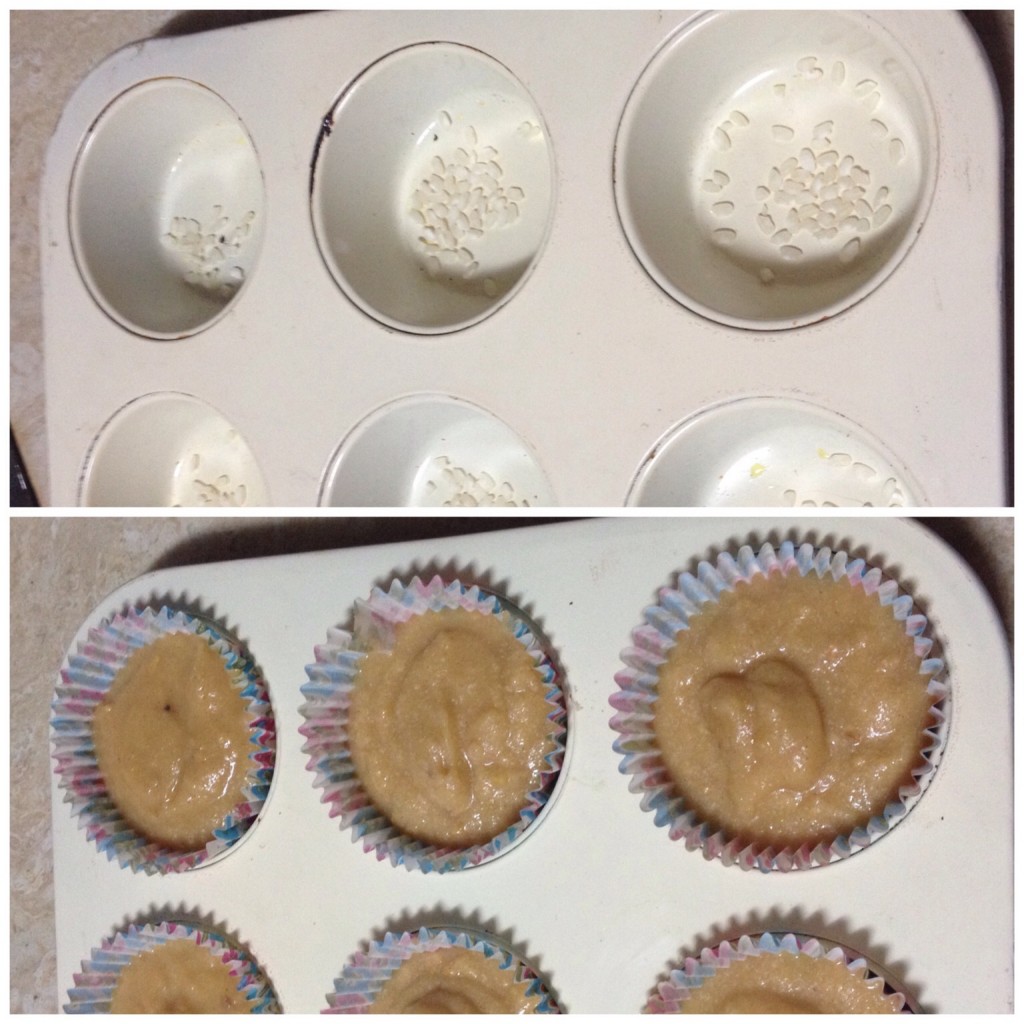
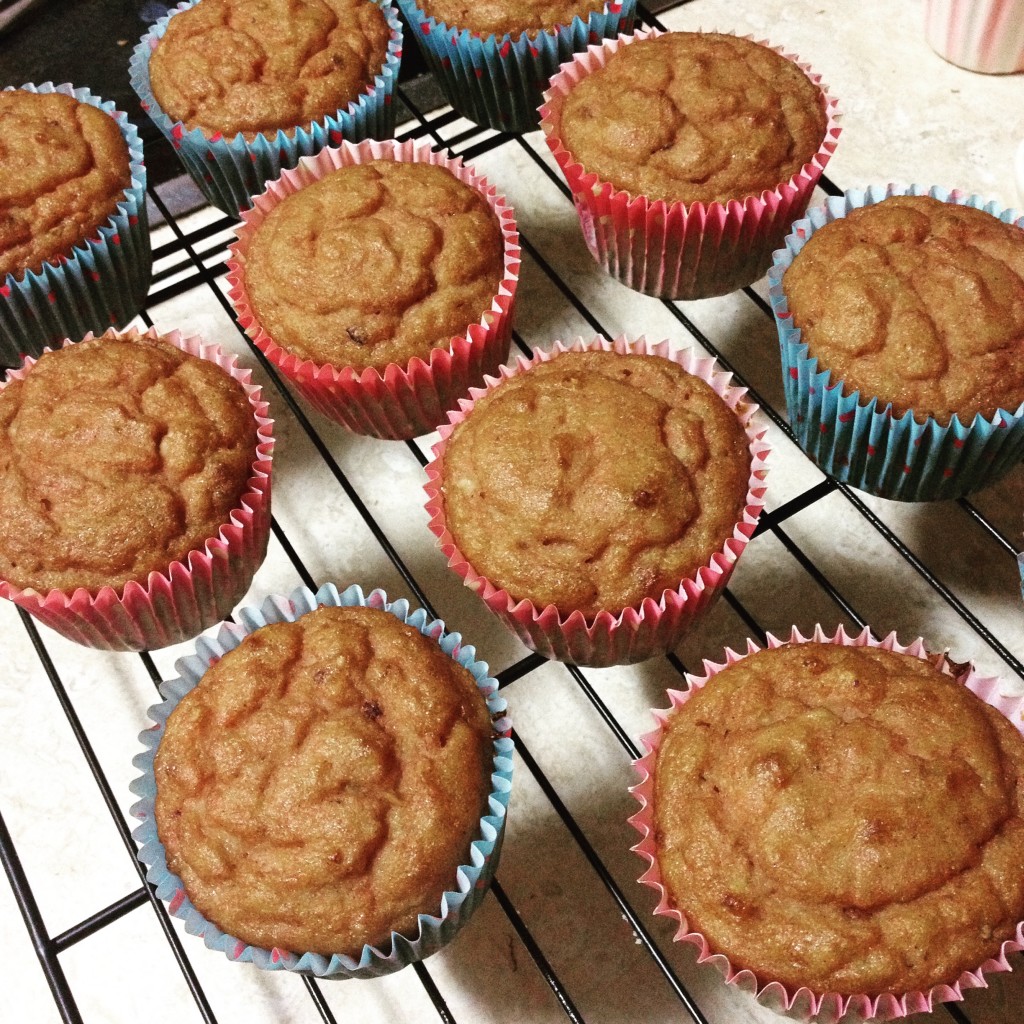
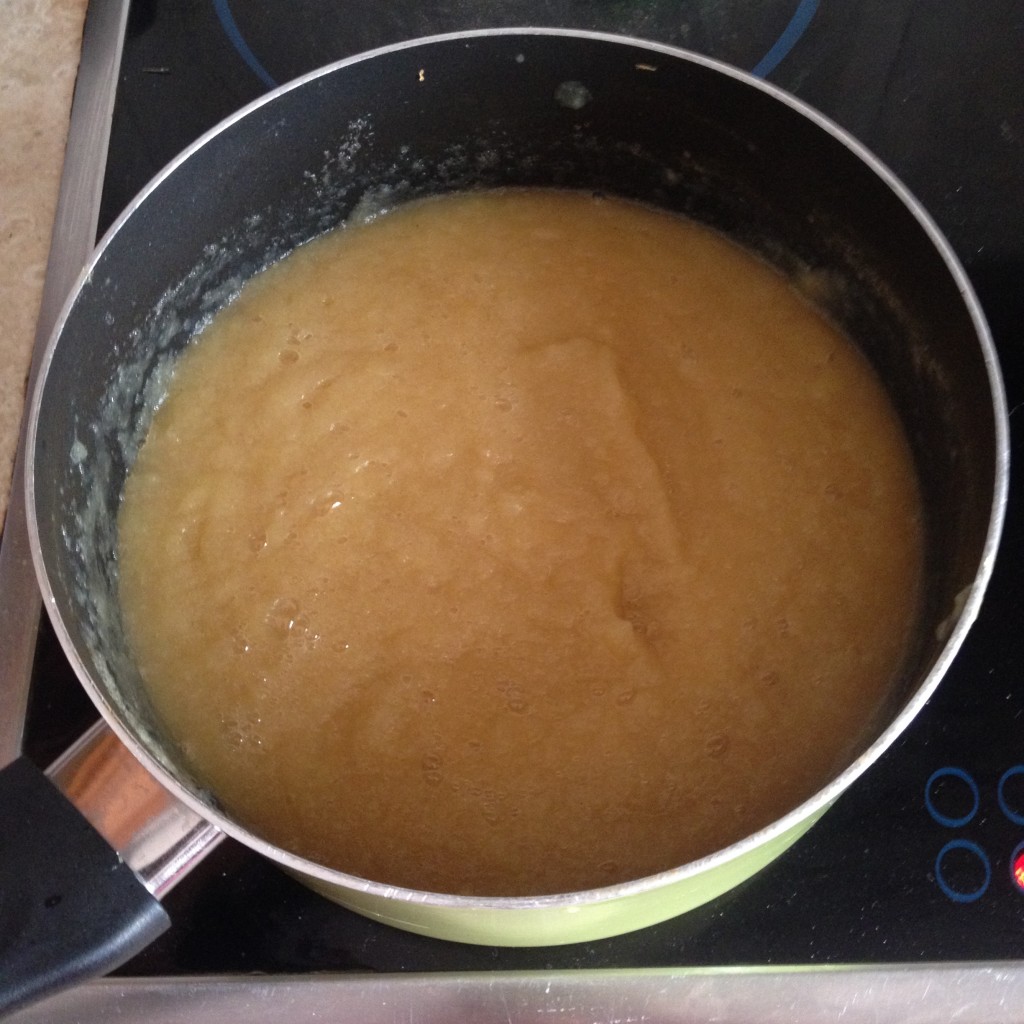
Sprinkle pumpkin with allspice and roast for about 1 hour in a preheated oven, wrapped in alum. foil. Let it cool, then blitz the flesh in a food processor until it forms a smooth puree. Preheat oven to 180 degrees Celsius. Mix the pumpkin puree in the bowl of a stand mixer with eggs, oil and vanilla until light and fluffy. Whisk dry ingredients together in a large mixing bowl and make a well. Add wet ingredients and and mix gently. Scoop in a lined cupcake tin until 2/3 full, then bake for 18-20 minutes or until a toothpick comes out clean.

While cakes are in the oven, you can prepare the frosting. Mix the butter and cream cheese for a few minutes in the bowl of a stand mixer, or with a hand one, until it’s all well incorporated. Add the sifted sugar in 2 batches, mixing really well between additions. Add a few spoons of milk if it’s too stiff to pipe – this will loosen it up.

Frost cupcakes in any way you like and enjoy with a hot cup of coffee or tea!

cut cupcake

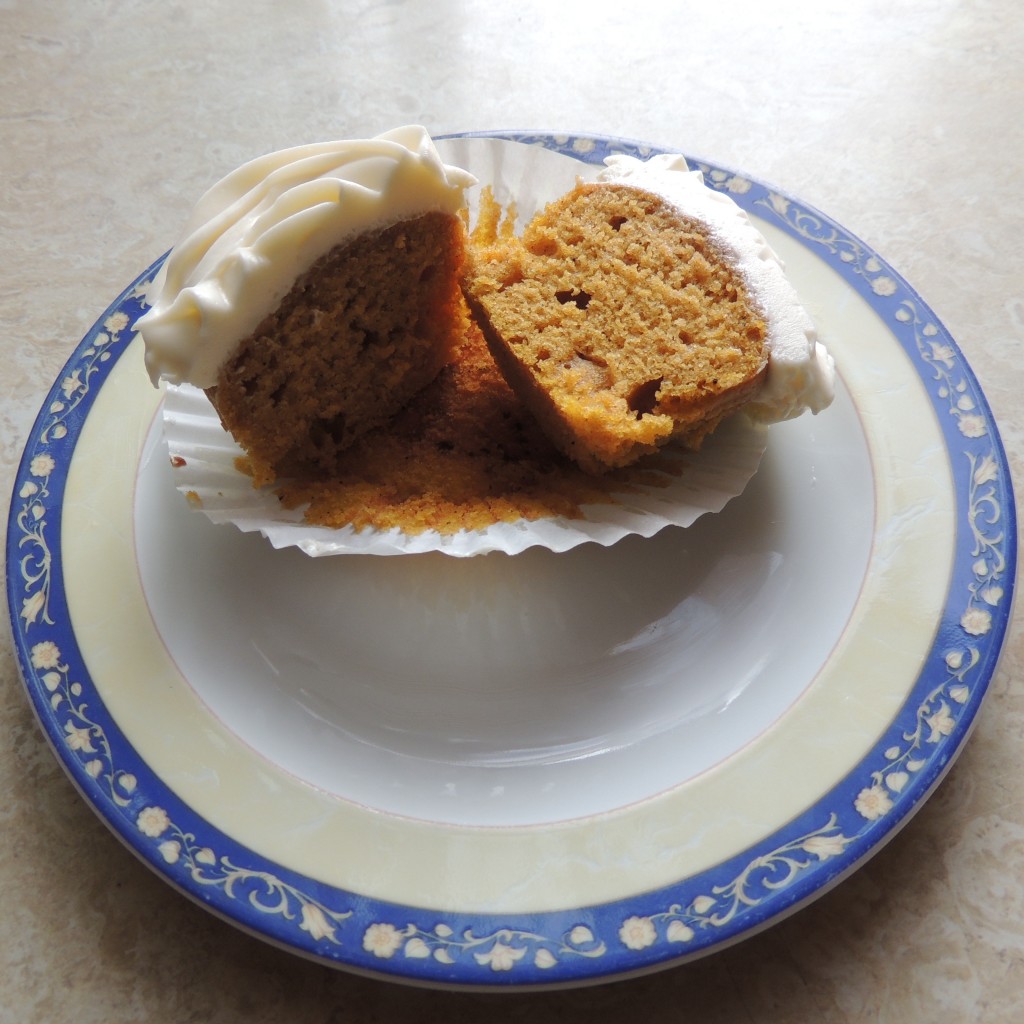
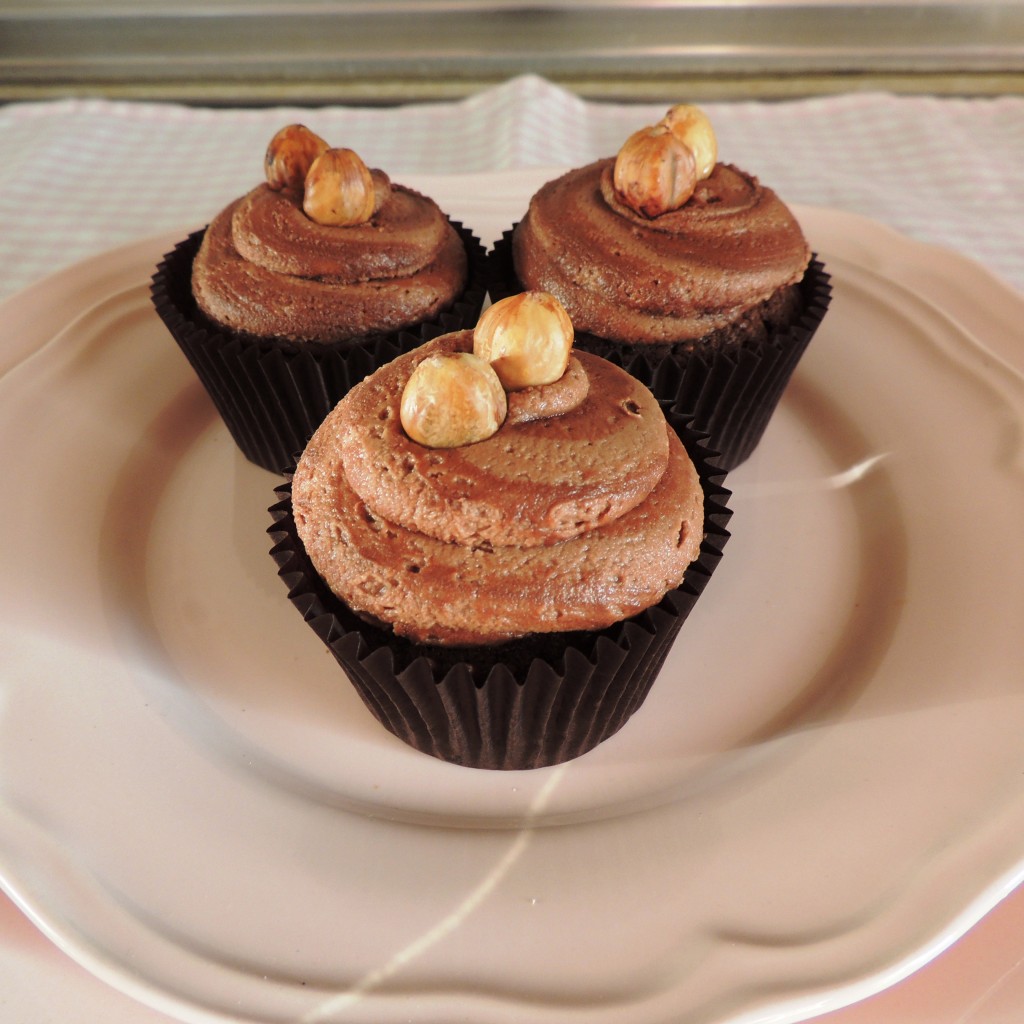
I love the colour pumpkin gives to cakes

Sharing is caringShare on FacebookTweet about this on TwitterPin on PinterestShare on Google+Share on Tumblr

Your chance to be a Cake King / Queen!

Sharing is caringShare on FacebookTweet about this on TwitterPin on PinterestShare on Google+Share on Tumblr

For the last 9 Wednesdays I have tried to be firmly sat on the sofa to watch the Great British Bake Off which of course has made me think of my own TV debut 2 years ago (and the 5 minutes of fame which followed). I had the chance to participate in a local, small scale (Christmas) version of the Bake off and let me tell you – it was the best!!! You can read more here and see some snaps on my original blog post about it. It seemed as if it would be a one-off thing though so imagine my surprise when I found out it is happening again this year. Not only this but they also used my cake for the poster. Needless to say, I have already shared it all over the Internet and how could I miss my blog?

As the winner of the previous cake off, I will actually be participating as a judge this year (how exciting!!!!) and I do recommend it to all bakers in and around Gibraltar. I had a blast and it is definitely a story I will be telling my grandchildren one day. Now go and email them quick, you only have time until October 15th to secure your place. You won’t regret it, I promise. And I will not be as harsh as Mary Berry or Paul Holywood. Just sayin’.

gbc poster cake off

Sharing is caringShare on FacebookTweet about this on TwitterPin on PinterestShare on Google+Share on Tumblr

Nutella Cupcakes [+RECIPE]

Sharing is caringShare on FacebookTweet about this on TwitterPin on PinterestShare on Google+Share on Tumblr

There are very few people I know who do not like Nutella. And they’re not close friends. Now, let’s be honest – who would want to be friends with anyone who doesn’t appreciate the warm fuzzy feeling this lovely hazelnut chocolate spread provides? There are also very few people in my life who do not like cupcakes (ok, I get it, you have a savoury tooth. Now go gobble your pack of crisps and close this blog. Nothing for you here). So needless to say, I have now made these Nutella cupcakes twice and they have been a success both times. The first time I used the original recipe Jemma posted, the second time I had no hazelnuts so I made her chocolate cupcake base instead and smothered it in the Nutella frosting. Both worked a charm! So here we go:

Jemma’s Nutella Cupcakes
(makes 12)

Ingredients:
For the cupcakes:
50g of roasted skinned hazelnuts, reduced to fine crumbs + 36 extra whole ones  to decorate (optional)
100g self-raising flour
25g cocoa powder
125g caster sugar
1/4 tsp baking soda
pinch of salt
140g unsalted softened butter
2 large free-range eggs
1,5 tbsp of whole milk with a little vanilla extract

For the frosting:
100g softed unsalted butter
150g Nutella
225g sifted icing sugar
A few tbsp of milk to soften it up

Method:
To make the cupcakes, sift dry ingredients together (incl. blitzed hazelnuts) in a medium bowl (or the bowl of the stand mixer), then add butter and eggs and mix for about 30 seconds on medium. Add milk and vanilla and beat for another minute.

Scoop even amounts in a lined cupcake tin and bake at 170 degrees Celsius for about 20-22minutes, depending on your oven.

In the meantime, you can make the frosting. Beat butter and Nutella together for 4-5 minutes on a high speed. Then add icing sugar in 2 batches, beating well inbetween (starting on a slow speed and increasing after). Add a few tablespoons of milk to soften it up if too stiff.

In order to make the frosting even better, add some of it in strikes to the inside of your piping bag with a palette knife (or a butter knife if you don’t have one). This will add nice stripes and extra flavour. Pipe as desired and pop a few whole hazelnuts on top to decorate.*

These did not last very long...

These did not last very long…

*The first time I added only 2 hazelnuts per cupcake. It was, however, my friend’s birthday and the restaurant added the candles in such a way that the ensemble did not look like 2 hazelnuts and a candle inbetween but… you know what I mean. So I strongly recommend using 1 or 3 hazelnuts each if you’d be adding birthday candles.

Sharing is caringShare on FacebookTweet about this on TwitterPin on PinterestShare on Google+Share on Tumblr

I present to you: ‘Mum on the Rock’

Sharing is caringShare on FacebookTweet about this on TwitterPin on PinterestShare on Google+Share on Tumblr

This blog post is well overdue but I am a strong believer in ‘better late than never’ so there you go. I am proud to be part of the team of Gibraltar’s new online magazine ‘Mum on the Rock‘ and, you guys, I have the BEST title in the world: Baker Extraordinaire!

profileMOTR
The first issue came out in the beginning of September and I produced National Day inspired Rice Krispies cake pops, you can find the recipe here. If all goes well, every month you will be able to read another exciting article written by yours truly!

I have been extremely excited about this project and this is the place to thank Polly who is behind ‘Mum on the Rock’ and who so warmly encouraged me after the revival of ‘Cupcakes & Unicorns’. At the time we were just fellow bloggers who followed each other on Twitter and it was great for me to receive such posotive feedback from someone who isn’t a close friend or family! She gave me the confidence I needed to believe a little more in myself and what I do. And this is a debt not easy to repay but thank you for everything, Polly! Thank you for your encouragement and for giving me the chance to be part of this amazing team of ‘Mum on the Rock’. Looking forward to what the future has in stock!

Sharing is caringShare on FacebookTweet about this on TwitterPin on PinterestShare on Google+Share on Tumblr

Decadent brownie cookies with posh sea salt [+RECIPE]

Sharing is caringShare on FacebookTweet about this on TwitterPin on PinterestShare on Google+Share on Tumblr

Following the 6th season of the Great British Bake Off closely has made me realise a few things. I am not posh, nor do I endeavour to be. I don’t use anything as fancy as rosemary in sweet bakes, or elderflower cordial. Hell, I can’t even pronounce cordial properly. But what I do, I usually do well, even if it’s more classic and has simpler ingredients. So I myself was really surprised by my recent splurge of 125g of Maldon Sea Salt flakes at the outrageous price of £2*. The recipe did call for it, though. And since I have now baked the same thing twice in 2 weeks for no particular reason (highly unusual for me) using these salt flakes, I am confident to say it was worth it. I hope this doesn’t make me a posh baker. Or does it? Eeeek.

In any case, I now feel obliged to share with you why you also need this salt in your life. Because it is used for sprinkling over the most decadent chocolate brownie cookies (and also good quality steak, but you know… it’s all about baking here). Trust me, you have subconsciously dreamt of these your entire life. So go ahead and indulge. You will want to thank me after (and please do so in the comments, if you like).

You can find the video tutorial here but I have written out the recipe for easier planning and shopping.

Jemma’s Salted Chocolate Brownie Cookies
(makes approx. 24, depending on your scoop size)

Ingredients:
395g dark chocolate bars or chips (at least 70% cocoa)
50g unsalted butter, chopped
120g rye flour (I couldn’t find it so I just used plain flour)
1tsp baking powder
1/4 tsp salt
4 large free range eggs
270g light soft brown sugar
Maldon sea salt for sprinkling

Method:
Using a Pyrex or metal bowl over a pot of water (also known as bain marie), melt chocolate and butter over low heat. Set aside to cool down a little. Crack eggs in the bowl of a standing mixer (or a large bowl if using a hand held one), add sugar and beat for 5-6 minutes with the whisk attachment until it is all very fluffy and has almost trippled in size. Add the chocolate and whisk on on low speed until it is all incorporated. Then add the sifted dry ingredients and mix very slowly (as if you’re folding it in).

Leave the mixture in the fridge for about an hour so the mix can set a little and can be scooped. Don’t even think of baking in straight away as it is sticky and liquidy like a brownie batter.

Once it is firm, scoop these on a baking tray lined with parchment and leave plenty of space inbetween. Flatten them out a little and sprinkle with the sea salt. Bake in a preheated oven at 180 degrees Celsius for 8 to 10 minutes, the center should be still a little soft to give them the chewy texture they deserve once they’ve cooled down. Let cool and try not to devour them all in 5 minutes. Or do.

brownie cookie raw

Before: Do not panic. Looks improve with baking time!

brownie_cookie_baked

It is difficult not to eat 3 or 5 at a time. Or, you know, all of them.

Sharing is caringShare on FacebookTweet about this on TwitterPin on PinterestShare on Google+Share on Tumblr

Aloha, you luau cookies and cupcakes!

Sharing is caringShare on FacebookTweet about this on TwitterPin on PinterestShare on Google+Share on Tumblr

For someone living at the sea side (and spoiled for choice between the Mediterranean Sea and the Atlantic Ocean), beach themed parties are kind of… well, normal. But you add a Hawaiian twist to them and BAM! Success, right?

So maybe I didn’t get to attend a Hawaiian party myself but I did participate in its organising one by making adorable luau cookies and cupcakes on order. I chose lemon flavour for the cookies, and Pina Colada (read pineapple and coconut) cupcakes. They turned out fingerlicking good but also really pretty.

I used the Biscuiteer’s vanilla biscuits recipe but added 2 lemon zests. I now swear by it! Best one for icing cookies (other recipes I’ve tried soak up too much water from the icing and become soft). They didn’t go soft or break without me having to add too much flour or baking them longer. I mixed and matched for the cupcakes – this base with the pineapple filling, and this buttercream. However, Jemma has recently posted her recipe for Pina Colada cupcakes, and it involves Malibu rum, so you might want to use her recipe too. You might be tired after baking so I strongly recommend to sit with a cocktail in hand and enjoy.

cookies_luau cupcakes_luau

Sharing is caringShare on FacebookTweet about this on TwitterPin on PinterestShare on Google+Share on Tumblr

Are Giant Cupcakes dying out?

Sharing is caringShare on FacebookTweet about this on TwitterPin on PinterestShare on Google+Share on Tumblr

A few years ago it was all about the Giant Cupcakes! Everyone wanted one so it’s not surprising I also got a giant cupcake tin. Used it a few times and then then it seemed that the popularity of the Giants died down so I stashed it at the back of my tin cupboard, forgetting completely it exists.

Until a few weeks ago when a friend asked me to make one for a birthday party. I was about to say I can maybe make a cake or normal cupcakes when it hit me I still have the tin! A little dusty but still in great shape, so why not? I baked a chocolate cake, filled it with a layer of nutella and buttercream and decorated it with white chocolate fingers for the sides, and buttecream rosettes and rose pink butterflies on top. And I fell in love again. Anyone else want a Giant Cupcake?
giant_1 giant_2

Sharing is caringShare on FacebookTweet about this on TwitterPin on PinterestShare on Google+Share on Tumblr

Guilt free muffins [+RECIPE]

Sharing is caringShare on FacebookTweet about this on TwitterPin on PinterestShare on Google+Share on Tumblr

While I take food allergies seriously, there seems to be a trend of going gluten free, whether you are indeed intollerant to it or not. Is it all a marketing scam to sell you oats at £8 a kilogram as opposed to the ‘normal’ ones costing only £1? Which is why I myself am rather skeptic to the ‘free from’ foods. But not when I make them at home! Then it’s not about gluten, but mostly about carbs, sugar, saturated fats etc. Which is basically what cake is made of, I know. But alas, I have finally found a recipe which is has no gluten, is low carb, has no sugar or butter, and actually tastes like baked goods! It also passed the toddler test when fellow blogger Polly Mixtures came over with Mini Mixtures- who, at the age of 1 and a bit, was absolutely ecstatic about those muffins. Calories – 0, Nadia – 1! Here the recipe, which I found on this blog and pimped by using my own home-made apple sauce and by adding roasted hazelnuts (I also had to bake for longer but I just blame my oven for this). It didn’t say how many muffins the recipe yields but I doubled it and ended up with 18.

Apple, cinammon and hazelnut muffins
(makes 9)

Ingredients:
5 large, free range eggs1 cup apple sauce
½ cup coconut flour
2-3 tbsp cinnamon
1 tsp baking soda
1 tsp vanilla (optional)
¼ cup coconut oil
1 cup of roasted chopped hazelnuts
Extra stevia if you prefer the muffins sweeter, mine actually tasted inbetween sweet and savoury, just how I like them

Method:
Preheat the oven to about 200 degrees Celsius. Line a muffin tin (I always sprinkle some rice under the cases so air can go under and they don’t go soggy. Mix all ingredients in a mixing bowl using a whisk. Let it sit for about 5 minutes. Pour into cases using an ice cream scoop or a spoon or a measuring cup until 3/4 full. Bake for about 20 minutes or until they are nice and golden and a toothpick comes out clean. You can glaze with honey or jam if you are not too fussed about the sugar in it (unles you get a sugar free one). Let cool and enjoy completely guilt free!

IMG_4813

Before the oven – kind of looks like baby food!

IMG_4815

That’s more like it!

Sharing is caringShare on FacebookTweet about this on TwitterPin on PinterestShare on Google+Share on Tumblr

Sugar free apple sauce [+RECIPE]

Sharing is caringShare on FacebookTweet about this on TwitterPin on PinterestShare on Google+Share on Tumblr

Season 6 of the Great British Bake Off started last night and I was suddenly itching to bake again (even though on Friday I was throwing plenty of ‘No more baking for at least 2 weeks’ around). But this time I wanted to eat it too and I am trying to eat healthy so I stay away from grains, sugar, butter – basically almost everything which cake contains. But I still have some coconut flour left so decided to explore the healthy baking road again.

The recipe I eventually chose called for apple sauce. Now, I have always been an ambassador for easy and have so far used store bought apple sauce. But since I am trying to avoid sugar, and since there was plenty of apples about to go bad in the fridge, I decided to finally succumb to making everything from scratch. Happy to report this time it was a success! This apple sauce can be used not only for baking but also to accompany roast pork etc. It is also easily customizable so you decide how much cinnamon you can add, how sweet to make it, how thick, etc. Here the recipe:

Home made sugar free apple sauce (also gluten free)
(makes a few cups)

Ingredients:
6 apples (any you like or have at hand)A pinch of cinnamon (optional)
A cup of water
1 tbsp stevia (optional), see picture below

Method:
Peel and chop apples. The smaller the pieces, the quicker it will cook. Add to a pot together with water, cinnamon and stevia. You don’t need to add sweetener if you don’t want the sauce to be too sweet but since I am using the sauce as a substitute to sugar, I added some stevia for extra sweetness. Let simmer over medium – high heat for approximately 20 mins, stirring occasionally. If you want a thicker sauce, use less water but stir more often to avoid sticking to the pan.
Once the mixture has been cooked and apples are nice and soft, puree with a hand held blender. Let cool and enjoy!

IMG_4805

The stevia I use for baking

IMG_4806

The finished apple sauce

Sharing is caringShare on FacebookTweet about this on TwitterPin on PinterestShare on Google+Share on Tumblr

Winter is coming! [GoT cake inside]

Sharing is caringShare on FacebookTweet about this on TwitterPin on PinterestShare on Google+Share on Tumblr

Last week we celebrated a dear friend’s 30th birthday. As it was quite the milestone, we went all out! Beach barbeque on the actual day, a weekend away in Tarifa with a Game of Thrones theme, all the works! This meant a few busy weeks – sorting out outfits, cakes, presents but in the end it all came up beautifully and we had one very happy birthday girl.

We put together a pretty presents display for her on the beach and were lucky to have a clear day so Africa acted as a natural backdrop. Magical!

display
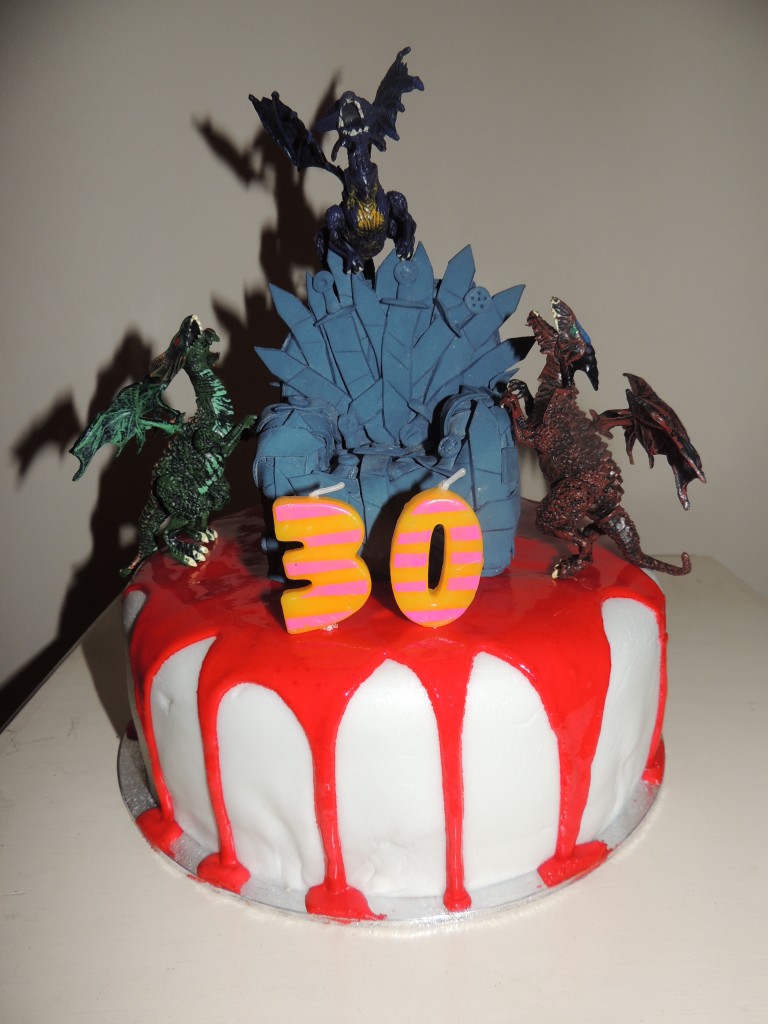
For the weekend celebrations, I had to make a themed cake. As it turns out, a Game of Thrones cake is not a easy thing. I initially wanted to make Joffrey’s crown out of chocolate and paint it gold for the cake topper. The weather was really not accomodating though – too hot for the chocolate to set, yet if you put in the fridge to set, it will sweat when it comes out so you cannot paint it. Then I tried royal icing, failed again. After 2 weeks of trying, I finally gave up on the crown idea and focused elsewhere. An iron throne should be easier to make, right? And easy enough it was, but little did I realise it will take so long!!! I used 2 YouTube tutorials combining making the actual throne from styrofoam and covering it in tiny swords made of sugar florist paste (I find the Squires Kitchen one the best). Note to self: do not use super glue for styrofoam. It somehow doesn’t agree and the glue eats through the styrofoam. Yikes!

Once I had the throne ready, I baked a simple chocolate cake and made a Nutella buttercream as per the request from the birthday girl. Then covered the cake in white fondant and blood made of red royal icing. On top I placed the throne and added 3 plastic dragon toys. I was pretty proud of the end result, what do you think?

DSCN1663

Sharing is caringShare on FacebookTweet about this on TwitterPin on PinterestShare on Google+Share on Tumblr